
Ah, the magic of the holiday season! There’s something truly enchanting about creating sweet memories in the kitchen. For many, it’s not just about baking—it’s about crafting moments that bring joy to family and friends. And when it comes to festive treats, Christmas Oreo Balls stand out as a delightful way to spread cheer. Whether you’re a seasoned baker or someone who rarely steps into the kitchen, these bite-sized wonders are easy to make and oh-so-delicious. Let’s dive into why they’ve become a holiday staple and how you can create your own batch at home.
The Magic of Christmas in Every Bite
Why These Sweets Are So Special
Think back to a time when you shared a plate of homemade goodies with loved ones. Remember the warmth, laughter, and connection? That’s exactly what Christmas Oreo Balls bring to the table. These little gems aren’t just desserts—they’re vessels of happiness wrapped in chocolate. They’re perfect for gifting, snacking, or simply indulging during those cozy winter nights.
What makes them so special? It’s their simplicity combined with rich flavors. Crushed cookies blended with creamy ingredients, then dipped in smooth chocolate—it’s a combination that’s hard to resist. Plus, they’re incredibly versatile. Want to add a peppermint twist? Go ahead! Prefer something nutty? No problem! The possibilities are endless, making them a favorite among bakers of all skill levels.
Understanding the Holiday Delight
H3: What Exactly Are Christmas Oreo Balls?
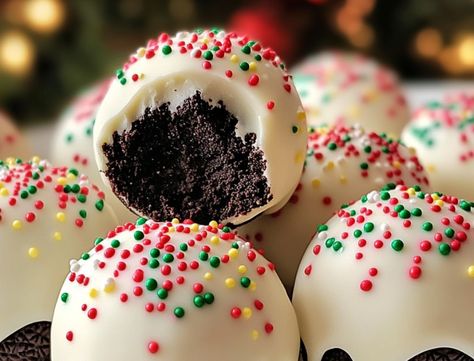
Let’s break it down. Christmas Oreo Balls are essentially a mix of crushed cookies, cream cheese, and other tasty additions rolled into perfectly round shapes. Once formed, they’re coated in melted chocolate, giving them an irresistible glossy finish. Some people even sprinkle toppings like crushed candy canes or colorful sprinkles for extra flair.
These treats have gained immense popularity over the years because they strike the perfect balance between effortlessness and elegance. Unlike elaborate cakes or pies, they require minimal preparation but still pack a punch in terms of flavor.

Key Points:
- Originated as a simple cookie-based treat.
- Gained traction due to their ease of preparation and customizable nature.
- Perfect for parties, gift-giving, or personal enjoyment.
Did you know? Studies show that homemade treats are often seen as more thoughtful gifts compared to store-bought options. This makes Christmas Oreo Balls an excellent choice for anyone looking to impress without breaking a sweat.
Gathering Your Supplies
Ingredients Table for Classic Christmas Oreo Balls
Before we jump into the recipe, let’s talk about what you’ll need. Here’s a quick rundown of the essentials:
Tips for Shopping
When purchasing ingredients, keep these pointers in mind:
- Always opt for fresh cookies and cream cheese for optimal texture.
- If you’re catering to dietary restrictions, consider using vegan cream cheese and gluten-free cookies.
- Invest in high-quality chocolate; it will enhance the overall taste significantly.
How to Make Christmas Oreo Balls
Now comes the fun part—making your very own Christmas Oreo Balls ! Follow this step-by-step guide to ensure success every time.
Crush the Cookies
Start by crushing the chocolate sandwich cookies into fine crumbs. You can use a food processor for efficiency, or if you prefer a hands-on approach, place the cookies in a resealable bag and crush them with a rolling pin. Be sure to remove the filling if you want a firmer consistency.
Mix with Cream Cheese
In a mixing bowl, combine the crushed cookies with softened cream cheese. Stir until everything is evenly blended. The mixture should hold together when pressed between your fingers. If it feels too dry, add a pinch of powdered sugar to bind it better.
Step 3: Form Into Balls
Once the dough is ready, scoop out small portions and roll them into uniform balls. Aim for consistency in size so they cook evenly later. Place the balls on a tray lined with parchment paper and refrigerate for at least 30 minutes. Chilling helps solidify the structure, making dipping easier.
Melt the Chocolate
While the balls chill, prepare your chocolate coating. Melt the semi-sweet chocolate according to the package instructions. Be careful not to overheat it, as burnt chocolate can ruin the entire batch. A double boiler or microwave method works well here.
Dip and Decorate
Take one chilled ball at a time and dip it completely into the melted chocolate. Use a fork or toothpick to lift it gently, letting excess chocolate drip off. Roll the coated ball in optional toppings like sprinkles or crushed candy canes before setting it aside to harden. Repeat until all the balls are done.