

The Charm of Bite-Sized Citrus Bliss – Your Personal Connection
Imagine this: you’re sitting in your cozy kitchen, the scent of fresh lemons wafting through the air. You take a bite of one of your freshly baked creations—a mini lemon tart—and it feels like sunshine on your tongue. There’s something incredibly satisfying about these small yet flavorful desserts. They’re not just food; they’re little bursts of happiness that can transform even the dullest day into something special.
For me, my love for mini lemon tarts began during a family gathering. Watching my grandmother carefully press dough into tiny molds and fill them with her signature tangy curd was mesmerizing. Each bite brought a sense of warmth and nostalgia, connecting me to cherished memories. Now, I want to share that same joy with you. Whether you’re hosting a party or simply treating yourself, mastering the art of making these delightful treats will bring immense satisfaction—and smiles—to everyone around you.
What Are These Tiny Citrus Gems?
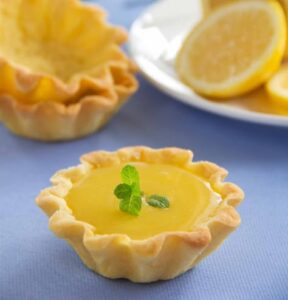
Let’s dive deeper into what makes mini lemon tarts so irresistible. At their core, these are bite-sized pastries filled with a creamy, zesty filling made from fresh lemons. But there’s more to them than meets the eye. Their charm lies in their simplicity and versatility.
Defining the Perfect Dessert
Here’s a quick breakdown of their essential components:
- Shortcrust Pastry : This forms the base, providing a buttery, flaky texture that complements the tangy filling beautifully.
- Lemon Filling : Typically made from lemon juice, zest, eggs, sugar, and butter, this part is where the magic happens. It’s smooth, rich, and bursting with citrus flavor.
- Optional Toppings : From meringue kisses to powdered sugar dustings, these extras elevate the presentation and add an extra layer of indulgence.
Did you know? Lemon-based desserts rank among the most searched-for recipes worldwide! People adore the refreshing balance of sweetness and acidity, which is why mini lemon tarts have become such a beloved treat.
Why Go Small but Mighty?
Choosing mini lemon tarts over their larger counterparts might seem trivial, but trust me, the benefits are worth considering. Here’s why these petite wonders deserve a spot in your baking repertoire:
Portion Control Without Sacrificing Flavor
One of the biggest advantages of mini lemon tarts is their size. They allow you to enjoy the vibrant flavors without feeling guilty about portion sizes. Perfect for those who prefer lighter desserts or want to offer a variety of options at gatherings.
Easier to Serve and Transport
Whether you’re planning a picnic, birthday celebration, or office potluck, mini lemon tarts are far easier to manage than full-sized ones. Simply pop them onto a plate or tray, and they’re ready to go.
Creative Presentation Opportunities
Their compact nature opens up endless possibilities for creative displays. Use tiered stands, themed platters, or even individual boxes to make your desserts stand out. Guests won’t be able to resist snapping photos of your culinary masterpiece!
Crafting Your Own Mini Lemon Tarts from Scratch
Now comes the fun part—learning how to bake your very own mini lemon tarts. Don’t worry if you’re new to baking; this step-by-step guide will walk you through every stage, ensuring success every time.
Ingredients Table
Step-by-Step Instructions
1. Prepare the Shortcrust Pastry
Start by mixing the flour, butter, and powdered sugar until the mixture resembles coarse crumbs. Add the egg yolk and knead gently until the dough comes together. Wrap it in plastic wrap and chill for at least 30 minutes.
2. Blind Bake the Shells
Roll out the chilled dough and press it into mini tart molds. Prick the bottom with a fork to prevent puffing and line each shell with parchment paper. Fill with baking beans or rice and bake at 180°C (350°F) for 10-12 minutes. Remove the weights and bake for another 5 minutes until golden brown.
3. Make the Lemon Filling
In a saucepan, whisk together the lemon juice, zest, eggs, and sugar. Cook over low heat, stirring constantly, until the mixture thickens enough to coat the back of a spoon. Remove from heat and stir in the butter until fully incorporated. Let it cool slightly before pouring into the pre-baked shells.
4. Add Finishing Touches
Once the tarts have cooled completely, decorate as desired. Try adding swirls of whipped cream, sprinkles of powdered sugar, or a drizzle of chocolate for an elegant finish.