
Have you ever pulled out your iron, ready to tackle that pile of wrinkled clothes, only to find the bottom caked with burnt-on residue? It’s frustrating, isn’t it? That sticky gunk not only ruins your fabrics but also makes ironing feel like a chore you dread even more. You’re not alone in this struggle—many people overlook the importance of maintaining their irons until it’s too late. I’ve been there—staring at my iron, wondering how something so simple could become such a mess. But here’s the good news: cleaning the bottom of your iron is easier than you think. With the right tools and techniques, you can restore your iron to its former glory and make ironing a breeze again.
In this guide, we’ll walk you through everything you need to know about keeping your iron clean and functioning like new. From step-by-step cleaning methods to preventive tips, you’ll learn how to maintain your iron effectively so it lasts longer and performs better. Let’s dive in!

Why Cleaning the Bottom of Your Iron Matters
Before jumping into the “how,” let’s talk about why cleaning your iron is so important. Many people don’t realize that neglecting this task can lead to bigger problems down the line. Here are some compelling reasons to prioritize iron maintenance:
Protects Your Clothes
A dirty iron can transfer stains or scorch marks onto your favorite garments. Imagine ruining an expensive blouse or a cherished outfit simply because you didn’t take the time to clean your appliance. The soleplate—the flat, heated surface of your iron—is prone to collecting residue from fabric softeners, starches, and melted fibers. Over time, these deposits harden and stick to your clothes, leaving unsightly marks.
Extends the Life of Your Iron
Regular cleaning prevents buildup that can damage the heating element or clog steam vents. When residue accumulates, it forces the iron to work harder, which can shorten its lifespan. According to appliance care experts, regular maintenance can extend the life of small appliances by up to 30%. That means less money spent on replacements and fewer trips to the store for you.
Improves Performance
When your iron’s soleplate is smooth and free of debris, it glides effortlessly across fabrics. This not only saves you time but also ensures that wrinkles are removed efficiently. A well-maintained iron heats evenly and distributes steam properly, making your ironing sessions faster and more effective.
Tools and Materials You’ll Need
Before you begin cleaning, gather all the necessary supplies. Having everything on hand will make the process smoother and more efficient. Here’s what you’ll need:
- White Vinegar : A natural cleaner that dissolves grime and mineral deposits.
- Baking Soda : Acts as a gentle abrasive to scrub away stubborn residue.
- Soft Cloths or Microfiber Towels : Prevents scratching while wiping down the soleplate.
- Cotton Swabs : Ideal for reaching tight spaces like steam vents.
- Toothbrush (Old or New) : Perfect for scrubbing hard-to-reach areas.
- Dish Soap : Helps remove grease or sticky substances.
- Distilled Water (Optional) : Reduces mineral buildup when used in the steam function.
Pro Tip : Avoid using abrasive materials like steel wool, as they can scratch the iron’s surface. Stick to soft tools and non-abrasive cleaners to preserve the integrity of your appliance.
Step-by-Step Guide to Cleaning the Bottom of Your Iron
Now that you understand why cleaning your iron matters and have gathered your supplies, let’s get into the nitty-gritty details. Below are three tried-and-true methods for cleaning the soleplate of your iron. Choose the one that best suits your needs—or try them all!
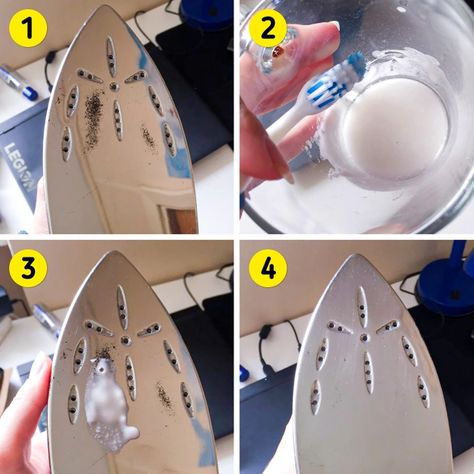
Method 1 – Using Vinegar and Baking Soda
This eco-friendly method is perfect for removing light to moderate buildup without harming your iron. Follow these steps:
- Mix the Solution : In a small bowl, combine equal parts white vinegar and water. Stir gently to create a cleaning solution.
- Apply the Mixture : Dip a soft cloth into the solution and wring it out so it’s damp but not soaking wet. Gently rub the iron’s soleplate in circular motions to loosen any residue.
- Scrub Stubborn Residue : Sprinkle a small amount of baking soda onto another damp cloth. Use it to scrub away any remaining gunk. Be sure to apply gentle pressure to avoid damaging the surface.
- Wipe Clean : Once you’ve removed all visible residue, use a clean, damp cloth to wipe down the soleplate. Dry it thoroughly with a dry towel before storing.
Why It Works : Vinegar breaks down mineral deposits, while baking soda provides mild abrasion to lift stuck-on debris.
Method 2 – Using Salt for Tough Stains
If you’re dealing with particularly stubborn stains, salt can be your secret weapon. Here’s how to use it:
- Heat the Iron : Turn on your iron to a low setting. Make sure the temperature is warm enough to soften residue but not so hot that it damages delicate surfaces.
- Sprinkle Salt : Lay a piece of aluminum foil on your ironing board and sprinkle coarse salt over it generously.
- Iron Over the Salt : Gently glide the hot iron back and forth over the salt-covered foil. The salt acts as a natural abrasive, lifting off stuck-on debris as you move.
- Wipe Down : Once cooled, wipe the soleplate with a damp cloth to remove any remaining particles.
Why It Works : Salt’s coarse texture helps dislodge hardened residue without scratching the iron’s surface.