
Imagine this: You’re rushing out the door, late for an important meeting or dinner with friends. As you turn your key in the lock, it snaps. Half of it is stuck inside, leaving you stranded and frustrated. Your heart sinks, your mind races, and panic sets in. What now?
We’ve all been there—or at least close enough to know how frustrating it can be. But don’t worry; we’re here to help you navigate this sticky situation. In this guide, you’ll learn how to remove a broken key from the lock safely and efficiently without causing further damage. Let’s dive in.

Why Keys Break in Locks—and How to Prevent It
Before jumping into solutions, it’s essential to understand why keys break in locks so you can avoid future mishaps. Understanding the root causes will not only save you time but also prevent unnecessary expenses.
Common Reasons for Broken Keys
Keys aren’t indestructible, and several factors contribute to their eventual failure. Here are some common culprits:
- Wear and Tear: Over time, repeated use weakens the metal. Just like any other tool, keys have a lifespan. If yours is old or frequently used, it may be nearing its breaking point.
- Poor Quality Materials: Cheaply made keys are more prone to snapping. Investing in high-quality keys can make a significant difference in durability.
- Forced Entry Attempts: Turning a key too hard when the lock is stiff can cause it to break. This often happens when locks are dirty, rusted, or misaligned.
- Lock Malfunctions: Dirt, rust, or misalignment in the lock mechanism increases resistance, putting extra strain on the key.
Tips to Prevent Broken Keys
Prevention is always better than cure. By taking a few proactive steps, you can extend the life of your keys and reduce the likelihood of them breaking:
- Regular Lubrication: Keep your locks well-lubricated with graphite powder or silicone spray. This reduces friction and ensures smooth operation.
- Avoid Excessive Force: If the key feels stuck, don’t twist it harder. Instead, inspect the lock for obstructions or call a professional.
- Replace Old Keys Promptly: If your key shows signs of wear—like bent edges or thinning metal—it’s time to get a replacement.
Pro Tip: Regular maintenance can go a long way in preventing these issues. Consider scheduling annual inspections if you rely heavily on specific locks (e.g., for your home or business).
Tools You’ll Need to Remove a Broken Key
Having the right tools on hand makes the process smoother and less stressful. Without proper equipment, you risk damaging the lock or injuring yourself.
Essential Tools List
Here’s what you’ll need to tackle the problem effectively:
- Needle-Nose Pliers – These are perfect for gripping small pieces of the broken key. Their slim design allows you to reach into tight spaces.
- Tweezers – If the key fragment is protruding slightly, tweezers might be all you need.
- Super Glue (Optional) – This can temporarily bond the key fragment to another object, making extraction easier.
- Thin Screwdriver – A small screwdriver can help nudge or align the key fragment within the lock.
- Lubricant – Helps loosen stuck parts within the lock, reducing friction during removal.
Safety Precautions
While removing a broken key isn’t overly complicated, it’s still important to prioritize safety:
- Wear gloves to protect your hands from sharp edges or splinters.
- Work in a well-lit area to see exactly what you’re doing.
- Avoid using excessive force, which could damage the lock or injure you.
Step-by-Step Instructions to Remove a Broken Key
Now that you’ve gathered your tools, let’s walk through the process step by step. Follow these instructions carefully to retrieve the broken key piece effectively.
Method 1: Using Needle-Nose Pliers
If part of the key is sticking out of the lock, needle-nose pliers are your best friend. Here’s how to use them:
- Inspect the lock to determine how much of the key is visible. Even a millimeter of exposed metal can be enough to grab onto.
- Carefully insert the needle-nose pliers into the lock. Position the jaws around the broken fragment.
- Gently grip the fragment and pull it straight out. Avoid wiggling it side-to-side, as this could push it deeper into the lock.
Method 2: Tweezering Out the Fragment
If only a tiny bit of the key sticks out, tweezers might work better than pliers. Here’s what to do:
- Use precision tweezers designed for small objects. These provide better control than standard household tweezers.
- Apply gentle pressure and slowly extract the fragment. Patience is key here—rushing could make the situation worse.
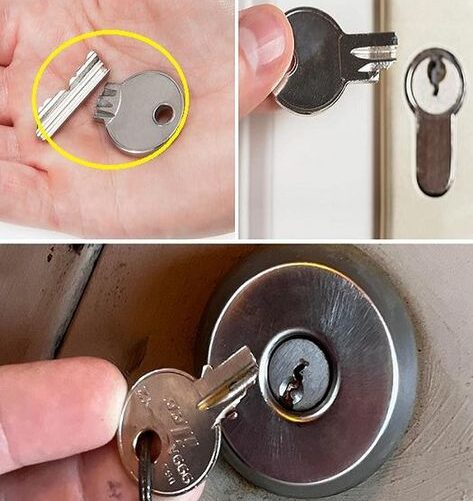
Method 3: Super Glue Technique
This method works well if no part of the key is visible, but proceed with caution. The glue must only attach to the key, not the lock itself.
- Apply a small amount of super glue to the end of a spare key or another flat object.
- Press it firmly against the broken fragment and hold it steady for 1-2 minutes.
- Slowly pull the glued key out of the lock. Be careful not to let the glue touch the surrounding lock mechanism.
Note: If you’re unsure about using super glue, skip this method. Accidentally gluing the lock shut creates a whole new set of problems.
Pages: 1 2